Contributing
PyUnfold is an open-source project and contributions are always welcome from anyone. Feel free to open a pull request on GitHub or file a new feature request or bug report on our issue tracker.
Contributing guide
If you are new to working with forks, check out GitHub’s working with forks article.
Step 1: Creating a new issue
- If you don’t already have a GitHub account, create one
- Go to the PyUnfold GitHub page and create a new issue by clicking on the “Issues” tab and then the “New issue” button


Step 2: Forking the repository
(If you have an existing configured fork of PyUnfold, you can skip to Step 4: Syncing an existing fork)
- From the PyUnfold repository use the “Fork” button to fork the project into your GitHub account

- This forked copy of PyUnfold can now be cloned to your local machine using
$ git clone https://github.com/<your_username>/pyunfold.git
Step 3: Configuring a remote for a fork
From your cloned copy of PyUnfold from the previous step, list the existing remotes with
$ cd pyunfold
$ git remote -v
You’ll most likely see something like
origin  https://github.com/<your_username>/pyunfold.git (fetch)
origin  https://github.com/<your_username>/pyunfold.git (push)
To add the original PyUnfold project repository as a remote (named “upstream”) to your copy of PyUnfold via
$ git remote add upstream https://github.com/jrbourbeau/pyunfold.git
Now when you execute git remote -v, the newly added upstream remote should be present
origin  https://github.com/<your_username>/pyunfold.git (fetch)
origin  https://github.com/<your_username>/pyunfold.git (push)
upstream        https://github.com/jrbourbeau/pyunfold.git (fetch)
upstream        https://github.com/jrbourbeau/pyunfold.git (push)
Step 4: Syncing an existing fork
To ensure that your existing fork is up-to-date with the original PyUnfold repository, fetch the upstream commits via
$ git fetch upstream
The output should look something like
remote: Counting objects: xx, done.
remote: Compressing objects: 100% (xx/xx), done.
remote: Total xx (delta xx), reused xx (delta x)
Unpacking objects: 100% (xx/xx), done.
From https://github.com/jrbourbeau/pyunfold
 * [new branch]      master     -> upstream/master
Now the commits to the master branch of jrbourbeau/pyunfold are stored in your local upstream/master branch. At this point, you’ll want to make sure (if you’re not already) that you’re on the master branch of your local repository
$ git checkout master
Switched to branch 'master'
Now you can merge the upstream/master branch into your master branch with
$ git merge upstream/master
Now the master branch of your local copy of PyUnfold should be up-to-date with the original PyUnfold master branch!
Step 5: Create a new feature branch
Next, create a new branch for the feature you would like to develop with
$ git checkout -b <new_feature_branch_name>
The output should be
Switched to branch '<new_feature_branch_name>'
Step 6: Install local copy of PyUnfold
Next, you’ll want to make sure that Python imports your local version of PyUnfold. This can be done by pip installing your local PyUnfold repository in editable mode
$ pip install -e .
To install additional development dependencies for running tests and building the documentation, instead run
$ pip install -e .[dev]
Note that if you previously had PyUnfold installed in your environment to pip uninstall pyunfold before executing the previous command.
Step 7: Develop new code!
Now add your feature, bug fix, typo fix, etc.
Step 8: Running tests with the new code
Once your contributions have been added, you’ll want to run the tests for this project to ensure that none of the new code breaks any existing tests. Tests can be run by going to the root directory of your pyunfold repository and executing
pytest pyunfold
To run with code coverage use pytest --cov pyunfold
Step 9: Documentation
If necessary for your contribution, add the appropriate documentation to the files in the docs/source/ directory. The documentation can then be build via
cd docs
make html
The built documentation will be placed in the _build/html directory.
Step 10: Committing and uploading changes
Now the changes you’ve made are ready to be committed and uploaded to GitHub. Let git know which files you would like to include in your commit via
$ git add <modifies_files_here>
and then commit your changes with
$ git commit -m '<meaningful messages about the changes made>'
Now you can push this commit from your local repository to your copy on GitHub
$ git push origin <new_feature_branch_name>
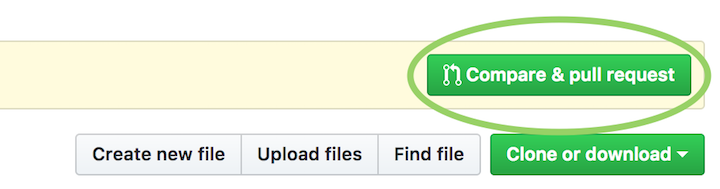
Step 11: Submitting a pull request
Finally, you can go to your copy of PyUnfold on GitHub and submit a pull request by clicking the “Compare & pull request” button!
If you’re new to writing pull requests, see GitHub’s How to write the perfect pull request article for a list of some best practices.